Table of Contents
Setting up your dark web server
This example is based on the raspberry pi and rasbian jessie (hence pi-star) as this is where most of the ham uses will be.
Log into your pi as root in a shell (log in and type sudo su)
Update the repository and install tor and nginx (nginx is already installed on pistar):
#  apt-get update
#  apt-get install tor nginx
In nginx, you will have one server instance set up. Maybe you want two. You need to give them two different ports. Edit the nginx config file to set it up:
nano /etc/nginx/sites-enabled/default
You will have the configuration up. You will see a section similar to this. Note this configuration is set up to use the non standard port of 8082 (instead of 80).
server {
        listen 8082 default_server;
        listen [::]:8082 default_server;

        root /var/www/tor1;

        index index.html index.htm index.nginx-debian.html;

        server_name _;

        location / {
                # First attempt to serve request as file, then
                # as directory, then fall back to displaying a 404.
                try_files $uri $uri/ =404;
        }
}
Change the 8082 to whatever port you want (not 9050) and make sure the root /var/www/tor1 is a folder that actually exists and is readable and writeable by the user www-data.
If you want two services, duplicate it, changing the port (ie goto 8083) and the folder /var/www/tor2 for example:
server {
        listen 8082 default_server;
        listen [::]:8082 default_server;
        root /var/www/tor1;

        index index.html index.htm index.nginx-debian.html;

        server_name _;

        location / {
                # First attempt to serve request as file, then
                # as directory, then fall back to displaying a 404.
                try_files $uri $uri/ =404;
        }

}

server {
        listen 8083 default_server;
        listen [::]:8083 default_server;


        root /var/www/tor2;

        index index.html index.htm index.nginx-debian.html;

        server_name _;

        location / {
                # First attempt to serve request as file, then
                # as directory, then fall back to displaying a 404.
                try_files $uri $uri/ =404;
        }
}
Enable and restart nginx and you should be able to access the site via its IP and port:
#  systemctl restart nginx.service
#  systemctl enable nginx.service
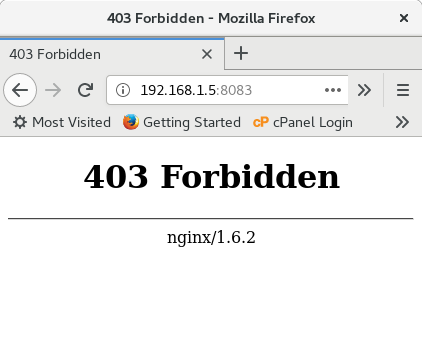 Unless you have put an index file into /var/www/tor2, you will get exactly the above image. The reason nginx is so good with this is, if you end up with a 404 or 403 page, it does not identify anything other than it is nginx in its standard form – another security bonus.
Setting up the TOR tunnel to your dark web server
Now that your web server is up and running, it is time to set up your tunnel and obtain an onion address.
Edit the torrc file:
# nano /etc/tor/torrc
Scroll down to the hidden services section. It will look something like this:
HiddenServiceDir /var/lib/tor/hidden_service/
HiddenServicePort 80 127.0.0.1:80
#HiddenServicePort 22 127.0.0.1:22
You want to edit it to match your web service created above:
HiddenServiceDir /var/lib/tor/hidden_service/
HiddenServicePort 80 127.0.0.1:8083
#HiddenServicePort 22 127.0.0.1:22
Where /var/lib/tor/hidden_service folder is the location where TOR stores the site details. This folder should only be accessable by TOR itself. TOR will create it when restarted.
Note the port number in bold matches the port number in your nginx configuration. The front port number is the port you want to access through TOR.
Save the file, enable and restart TOR:
#  systemctl enable tor.service
#  systemctl restart tor.service
Now if you navigate into the tor hidden service folder, there will be a file called hostname. View this, and the first part is your onion address:
#  cat /var/lib/tor/hidden_service/hostname

7m2aihgv75ks63qi.onion
#
After a minute or so, your onion address will populate through the dark web, and you will be able to access it from anywhere WITHOUT opening any firewall ports.
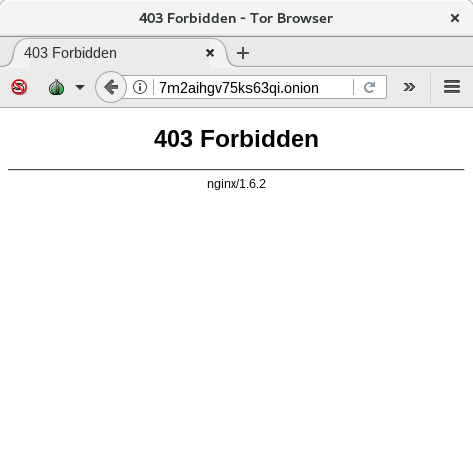 This is the basics of setting up a tor service. Unless you tell people your onion address, there is very little chance of anyone ever finding your server. BUT. The rabbit hole goes deeper. There is more we can do to secure it, and there is also more than web site access we can do……..
SSH access to your server
Some of you would have noticed the #HiddenServicePort 22 127.0.0.1:22 in the torrc file. Take the # out of it and restart TOR.
This opens up the SSH port on the server for you to access. However, it does not allow access through the standard ssh command:
 However. here’s what we do. We install tor on the PC you are trying to access the ssh server from.
Ubuntu/Debian based installations: apt or apt-get install tor
Centos/Fedora based installations: yum or dnf install tor
Once TOR is installed, you simply run the command like this:
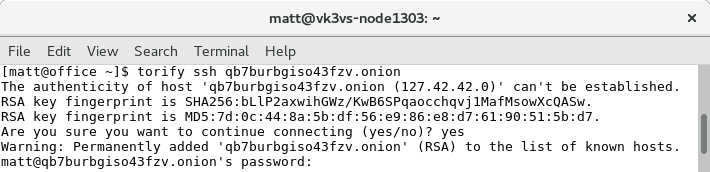 And you’re in. Again, no need to open any holes in your router.
Note, all these addresses have been set up purely and simply for this article. They will not exist by the time the article is printed.
SSH is now alive and well in your dark web service.
SSH from your Android Phone
 Checking the screenshot of Orbot above, you will notice under Tor-Enabled apps, a command line looking icon. This is ConnectBot SSH. It is available from Google play as well. In Orbot, you have to enable the VPN, then click the settings icon, then select ConnectBot. This will allow it to connect over TOR.
More security……
As you can see in the previous chapter, we can “torify” a command to allow it access through the dark web. Since we can do it, so can a hacker…
A hacker, if he gets hold of your onion address, can torify a port scanner and get it to scan the ports on your dark web server, finding an open port 22. On the clear web, a smart person would have fail-to-ban or similar installed to circumvent this after a couple of tries, and hopefully he gives up and annoys someone else, but in the dark web, everyone who attempts to connect to your dark web server looks the same to the server…. It’s part of that anonymity referred to earlier.
So now, we delve into keys. They have to be installed on any client that tries to access your dark web server.
To set up authentication, you need to edit the torrc file on your dark web server again, and add a line to it:
HiddenServiceDir /var/lib/tor/hidden_service/
HiddenServicePort 80 127.0.0.1:8083
#HiddenServicePort 22 127.0.0.1:22
So it becomes
HiddenServiceDir /var/lib/tor/hidden_service/
HiddenServicePort 80 127.0.0.1:8083
HiddenServicePort 22 127.0.0.1:22
HiddenServiceAuthorizeClient stealth hidden_service
Save it, and restart TOR.
Now in your /var/lib/tor/hidden_service folder, there will be a couple of keys and a modified hostname file. Cat it:
qb7burbgiso43fzv.onion N#@#@#@#@#@#@#@#@#@#@B # client: hidden_service
It will show you the address, and the key required for you to access hidden_service, on ANY port. Without the key, the client will just get a timeout message.
Write the key down (it is case sensitive), as you need it put that key onto any client you wish to give access to your dark web server.
As you have two different TOR versions on your client PC (one is installed on your PC and we use it with SSH, the other is bundled with the TOR-browser), we need to install this key in two different places on your PC.
For SSH to work, on your PC, edit the torrc file:
# nano /etc/tor/torrc
Go right down to the bottom of the file and add the following:
Rest of file…

HidServAuth qb7burbgiso43fzv.onion  N#@#@#@#@#@#@#@#@#@#@B
And restart TOR.
For your browser, you have to dig up the torrc file that comes with it. It will be somewhere like ~/tor-browser_en-US/Browser/TorBrowser/Data/Tor/torrc.
Add the same line to the end of the file and restart the browser.
There it is, a secure interface to control the VK3RWO repeater, which I can access anywhere.
Keys on your Android Phone
Within Orbot, you need to click the 3 dots on the top right, click Hidden Services, then Client cookies. Enter the site and the key…. Restart Orbot. Simple as that!
Upgrading to TOR V3
At the time of writing this, TOR V3 has been released stable. The astute amongst us would have noticed that the address for my website above was 56 characters long vs. 16 characters long for a V2 address.
Note: Upgrading to V3 does not (yet) allow 56 character names on Hidden Auth Services, they still have to be 16 characters long.
If you wish to have the 56 character long onion, you need to either:
- Centos/Fedora, compile TOR from source, or
- Debian/Ubuntu, add repositories and install it.
The following applies to Ubuntu Bionic Beaver (18.04LTS).
In a shell, you need to install apt-transport-https and modify the sources:
#  sudo apt install apt-transport-https
#  sudo nano /etc/apt/sources.list
Add the following to the bottom of the file and save it:
deb https://deb.torproject.org/torproject.org bionic main
deb-src https://deb.torproject.org/torproject.org bionic main
Then you need to add the gpg keys to sign the packages, update the repositories and install it, in the shell type:
#  gpg2 --recv A3C4F0F979CAA22CDBA8F512EE8CBC9E886DDD89
#  gpg2 --export A3C4F0F979CAA22CDBA8F512EE8CBC9E886DDD89 | apt-key add -
#  apt update
#  apt install tor deb.torproject.org-keyring
Make sure its enabled and running:
#  systemctl enable tor
#  systemctl restart tor
Now to convert your sites to V3 addresses, edit your /etc/tor/torrc, and add the following line:
HiddenServiceDir /var/lib/tor/hidden_service/
HiddenServicePort 80 127.0.0.1:8083
#HiddenServicePort 22 127.0.0.1:22
HiddenServiceVersion 3
Save the file and restart TOR. Your new address will be in hostname.
If you have HiddenServiceAuthorizeClient option on your site, when you restart TOR, it will fail as V3 does not yet support this.
Further investigation
There is only one thing I can see needing further investigation:
- Other Ham uses of the Dark Web.
Summary
This is about as good as you can get for security, anonymity and Access of equipment on the other side of public NAT’s and Firewalls. We have created a dark web server, that has:
- No IP address anybody can find.
- A web address that is not publicly accessible on the clear web.
- A way around Public NAT’s on 4G connections
- A way around Firewalls.
- No open ports on your router.
- An address that only you will know, if it is found by (a deliberate) accident,
- You have authentication that only you have the key to
- An address that you don't pay for
- You’re able to change that address if something goes horribly wrong with the address your using.
- Not paying for a VPN
- You don't have any hassles if your IP address changes, TOR will repopulate
The downside, its slower than the clear web.
A Parting thought
As I mentioned earlier, “think pi-star”, I thought I’d leave these couple of photos as food for thought.
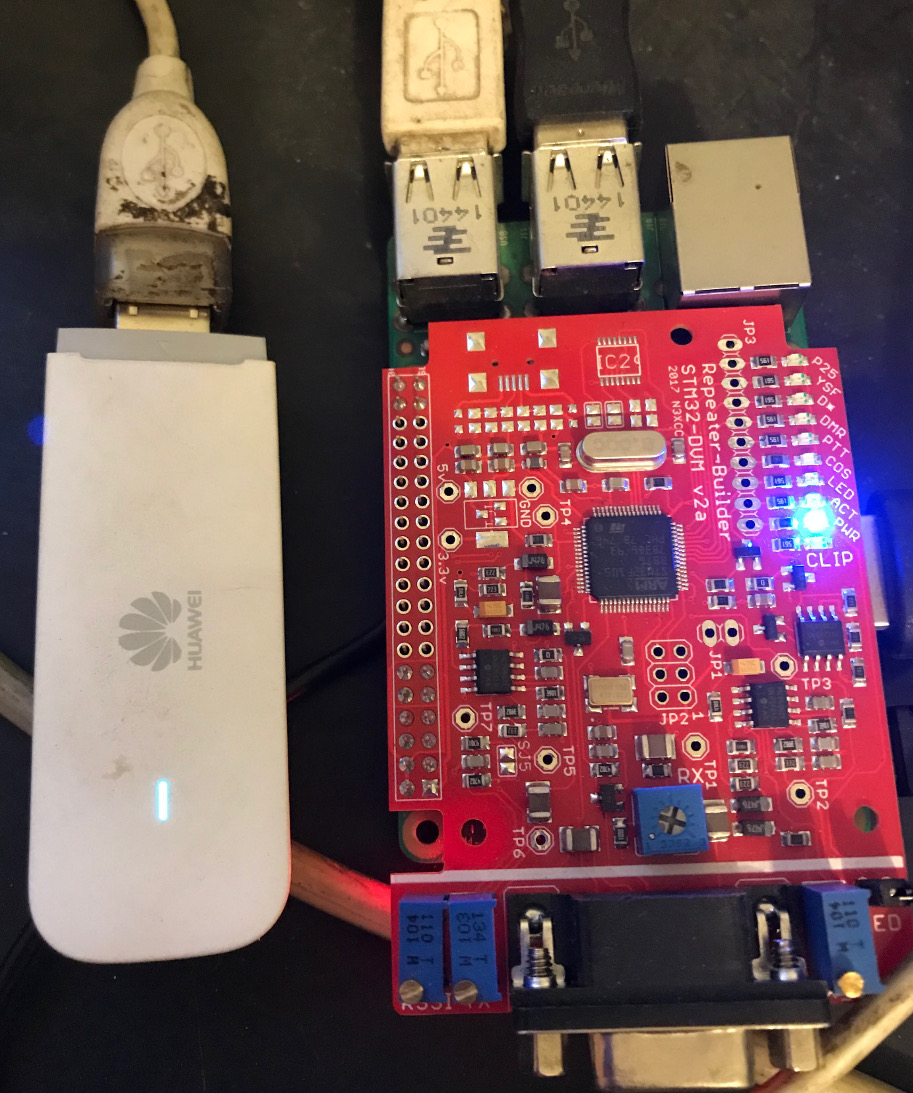 Here is a Raspberry Pi 3b, an MMDVM board, and an Optus 4G modem with an “extra” data sim that is attached to my mobile plan. Optus will not give public IP addresses to personal plans,and as a result, this device is behind a Public NAT.
Note, there is NO cable plugged into the LAN port of the Pi.
This is the start of the MultiMode VK3RWO repeater…
Getting the 4G modem to work on a command line Pi without user interaction is an article on its own……
Here is the proof in the pudding. The Pi-star interface is accessible over the 4G network, behind a public NAT, as a TOR hidden service on the dark web with Client Key protection.
What more do you want?